Best Montessori and learning toys for 2 year olds
What are Montessori toys?
Officially, there is no such thing as a Montessori toy; anything that fits the philosophy can qualify. Simple toys made of natural materials allow your toddler to practice one skill at a time and make for great Montessori-aligned playthings.
Uncomplicated in construction and purpose, these kinds of toys feel good to hold, don’t provide excess stimulation like bright lights and loud noises, and tap into your child’s natural inclination to learn.
Learn more about what makes something a “Montessori toy.”
What are the best Montessori toys for 2-year-olds?
2-year-olds are increasingly aware of themselves as separate from others, and they love to make sense of the world by categorizing and sorting. The best toys for this year support this emerging independence and sense of identity. They also give your child opportunities for fine and gross motor practice, problem-solving, practical life skills, and more.
Here are our picks for the best Montessori toys for 2-year-olds:
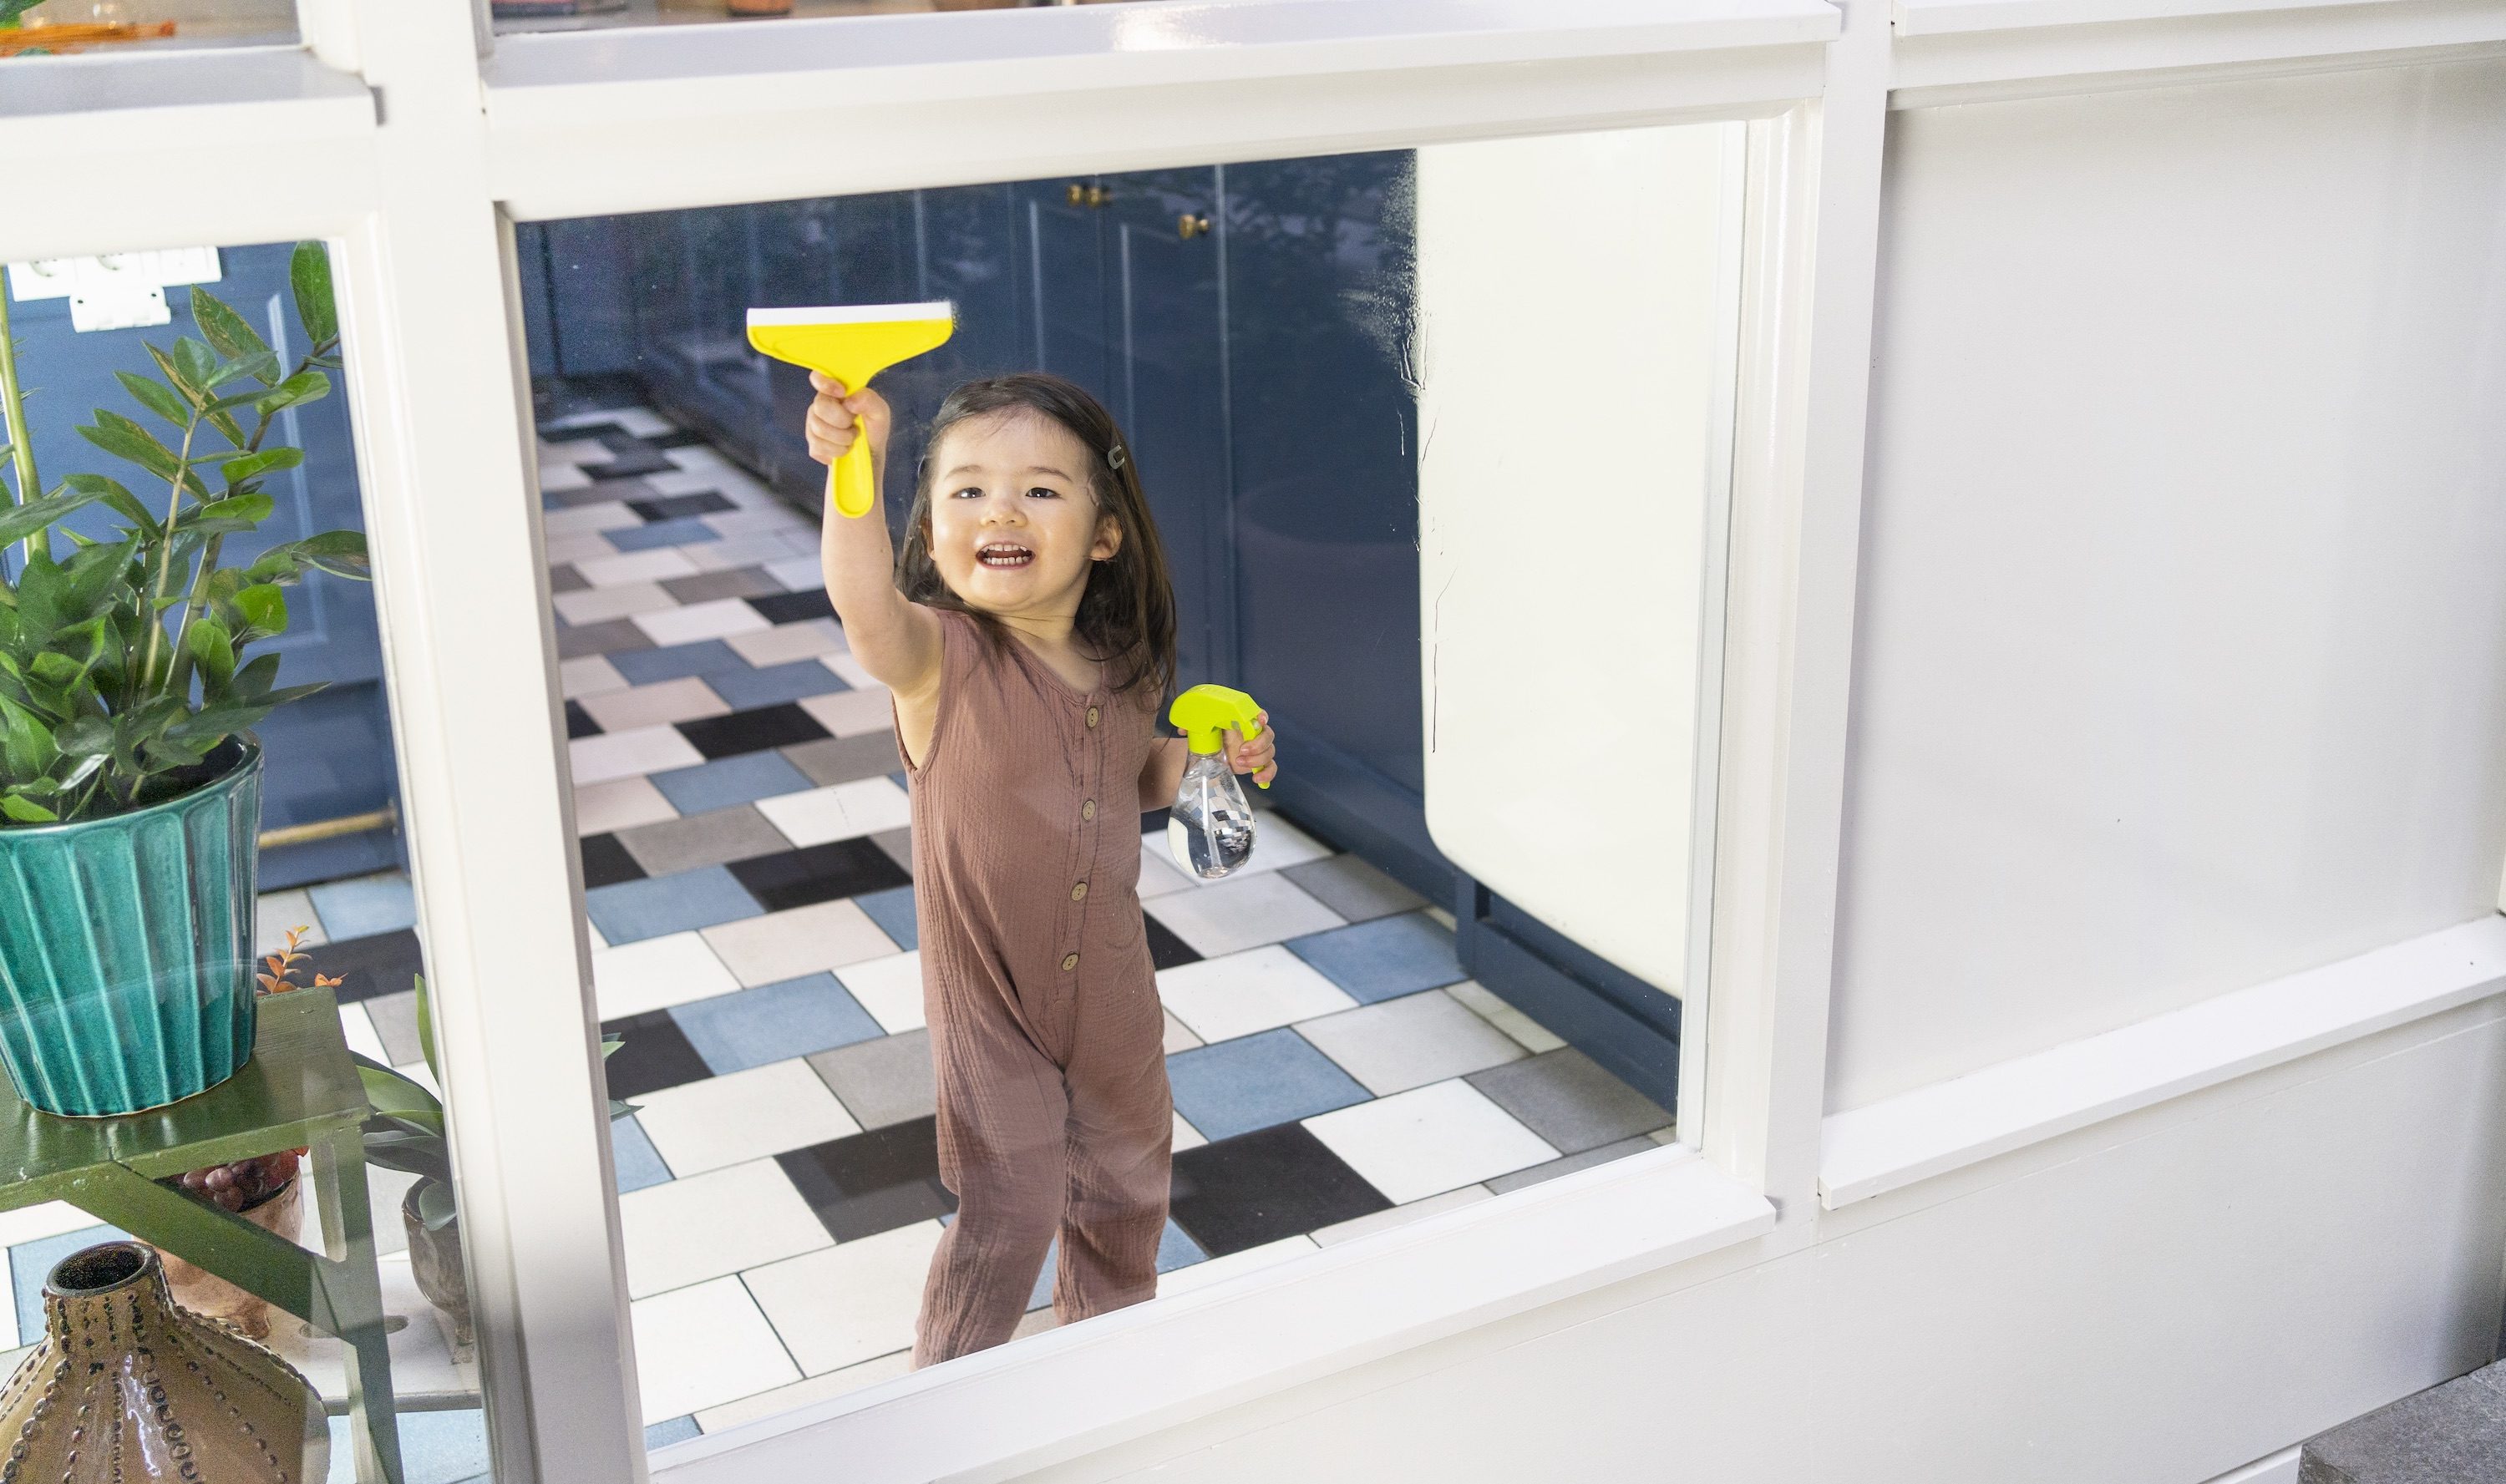
Cleaning with a child-sized squeegee and spray bottle
The Montessori philosophy encourages children to start cleaning up after themselves as soon as they are able. Real tools sized for their bodies help children participate in household tasks like washing windows and mirrors—even if the glass is still a little streaky when they’re done 🙃 Using a spray bottle and squeegee requires both concentration and two-handed coordination, while squatting down low or reaching up high will strengthen and stretch important muscle groups.
Ideas for practice:
- Invite your child to help you with household chores whenever they’re interested. To encourage them, you can ask if they would like to help with a specific task: “would you like to clean a spot on this window?”
- If you have a glass door, low windows, or a full-length mirror, encourage your child to use their spray bottle to wet the glass. Narrate what they are doing by using action words like spray, mist, and squirt.
- Show your child how to use the squeegee to wipe the water. They will love helping you wash the windows, and feel so proud when they’re done ❤️
- Your child can use the spray bottle to water plants or spray other easy-to-clean surfaces.
Everything in its place with a Montessori placemat and utensils

In Montessori, “sensitive periods” are stretches of time when your child is interested and ready to learn certain skills. Right now, your child’s sensitive period for “order” is still at its peak—they want everything to be in its proper place. A Montessori Placemat with child-sized forks and spoons will show them where to put their plate, cup, and utensils for mealtime. A napkin with visible, oversized stitching helps them learn how to properly fold.
Ideas:
- Introduce the placemat and show your child where everything goes. Using the same kinds of tools adults use (like the steel utensils provided with the placemat) is a foundational Montessori principle. This allows your child to learn what different materials feel like and how they behave.
- Invite your child to set their own place at the table. Consider using the same cups, and plates you use, and store everything your toddler needs where they can reach it.
- The napkin includes visible stitching along the folding lines. Lay it out flat, and show your toddler how to make two folds so the napkin fits on its outline on the placemat.
Introducing and choosing routines with cards

2-year-olds like to know what’s going to happen, so routines are particularly helpful right now. Cards with simple images showing your child what they’re expected to do every day attach a visual prompt to the routine, which supports anticipation and sequencing skills. This can help make daily tasks like bedtime and getting ready to leave your home a little smoother. In addition to helping ease transitions, routine cards also teach your child that symbols have meaning and order. This is a part of early literacy.
Ideas for practice:
- Select the cards that apply to your daily routines and review them with your child. Consider lining up three or four in a row to start, adding more as your child becomes familiar with a visual schedule.
- Ask questions so they know what each card represents: “what is that child doing? That’s right, they’re brushing their teeth, just like you do every night before bed.”
- To help your child learn how to anticipate events, consider using language that describes the future: “after you put on your shoes, we will get into the car.”
- Once they start to get the hang of it, try pointing to the cards when it’s time to do a routine and say “it’s time for you to do this one.”
- Try writing your own routines on the blank cards provided.
Nap on the go with a Nap Mat

A Montessori floor bed allows your child to get in and out without the constraints of a crib, giving them more freedom and independence when they wake up. The Organic Nap Mat lets you take this concept with you wherever you go.
Ideas for use:
- Consider introducing the Nap Mat to your child at home before using it on the road. This will let your child become familiar with it in the comfort of their own space.
- The Nap Mat was designed so that your child can help roll and unroll it. This teaches them independence and gives them something to be in charge of.
- The Nap Mat works great in daycares and preschools.
Lessons in liquid conservation

Conservation is the idea that things stay the same when they change shape. This is a concept your child is not likely to master for years, but it’s likely to delight your child and it’s good problem-solving practice. By 30 months, your child may be able to start pouring water from the Liquid Lab pitcher to the glass and then back again, which requires concentration, motor planning, and self-regulation.
Ideas for play:
- Start with a small amount of water in the pitcher and show your child how to pour from the spout (over the tray).
- Set the pitcher on the tray with the handle facing out. Then, show your child how to grasp it with their thumb on top and one or two fingers through the handle.
- Pouring practice isn’t just for liquids. Rice, lentils, orzo, sand, and other very small objects are also fun to pour.
- The sink or bathtub are great places to let your child experiment with pouring on their own.
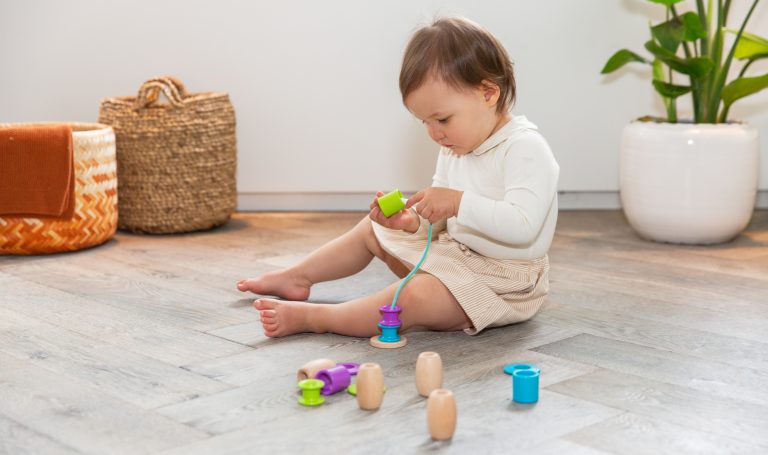
Fine-motor matching with colorful wooden dots

Children at this age are trying to find order, and matching is a great way for them to do that. This classic Montessori activity supports executive function and promotes deep concentration. Dropping colored dots into their corresponding slots—and sliding the tab to release them—both build fine motor skills and strengthen hand-eye coordination. As your child identifies a color, chooses the matching coin, and makes color-based patterns, they learn to plan ahead and categorize.
Ideas for play:
- Introduce the dots first, and group them into color stacks while identifying them: “these dots are all red.”
- Before you suggest color matching, let your child drop the dots into the board however they want.
- Color rings are arranged in rows on one side, and columns on the other. Try creating a row of all red dots (left to right) to match the red-ringed slots, and see if your child wants to create the next colored row on top of yours.
- Next, try making a column on the left side, counting as you drop each dot; ask your child to create the next column.
- Lots of practice working the release mechanism to let the dots drop out will probably be extra exciting for your child 🙃
Transporting and comparing with a balance scale

Around this time, your child may start using tools to solve problems. By using a bucket, they learn that they can transport several items at once from room to room. This is an important cognitive skill that demonstrates both foresight and an ability to invent new methods to reach a goal. Your child can also use the scale to notice the contrast between heavy and light, and learn concepts like balance and weight.
Ideas for play:
- Give your child a collection of small items (the dots from the Drop and Match Dot Catcher work great) and one of the pails. Encourage them to put all of the items into the bucket.
- Fill the other pail with something different—like pebbles, small toys, or marbles—and wonder together which bucket will be heavier after placing the objects inside them.
- Try weighing the full buckets on the scale: “look, the heavy one sinks down low while the lighter one rises up.”
- Play a guessing game: calibrate the scale with the sliders to make the pails level, then pick two objects and guess which one will be heavier. Try them out and see if you were right.
- You can do this as a sensory experience with rice, pasta, seeds, cornmeal, water, or ice cubes.
Cause and effect with a Hammer Box

Cause and effect is a big theme in Montessori teaching and learning. It’s the idea that if you do one thing, another thing happens as a result. In this case, each time your child hammers, a peg goes down (if they miss, the peg stays put 🙃). Hammering and pounding improve hand-eye coordination, arm strength, concentration, and focus. This kind of activity is also fun for your child to do with just their hands. The color cards add a color matching challenge that your child may be interested in now.
Ideas for play:
- First, show your child just the box (without the cards and hammer). Invite them to press the pegs into the holes and take them out with their hands.
- Next, introduce the hammer: encourage your child to try pounding and tapping with different amounts of force. This is a good exercise in self-control.
- Select a pattern card and lay it down on top of the holes. Show your child how to take a peg and match it to the color on the card, then either push or hammer it in. Invite your child to try the next one—it’s okay if they aren’t able to match.
- Demonstrate how to hammer the pegs in order. Start with the top left hole, continue to the right, then jump back down when you reach the end of a row. This is naturally how we read and write in English, and a good way to train your child’s eyes. Note that your child’s interest in and readiness for this ordered approach may come later.
- For an extra spatial and challenge, take the same card and prop it up into the groove, helping your child match the colors by moving their eyes back and forth.
Tracking the passage of time with a visual timer

Transitions are often difficult for a 2-year-old, because the end or beginning of something can take them by surprise. A tool like the Countdown Color Timer—a real timer they can watch—can help them learn to anticipate when something’s going to end or begin. Though your child doesn’t yet understand time, seeing the minutes pass by in a bright and colorful way can be soothing as they learn.
Ideas for play:
- Introduce the timer to your child when they’re calm and let them play with it, encouraging them to be gentle.
- If your child is upset, see if holding and watching the timer relaxes them. It may be interesting (and calming) for them to watch the dial move.
- Though your child is still years away from truly understanding how time passes, you can introduce the concept now. Set the timer for five minutes and say, “the timer will beep in five minutes and then we are going to put on our shoes.” They won’t know what five minutes means, but hearing the phrase and waiting helps them understand how time passes.
- Even if you’re not timing something, you can watch the timer together to help your child calm down. Narrate and label feelings: “It looks like you’re upset and angry; let’s watch the timer and breathe together—now I see you’re feeling a little calmer”
Making numbers visual with falling pegs

At this age, your child may be able to recognize and name some numbers. Showing them a numeral (“2”) next to a physical representation (2 blocks) helps create an association between the two and helps give meaning to the symbols. This counting box represents each number in three ways—numerals, words, and pegs. Early exposure to numeracy helps pave the way for stronger number sense later on.
Ideas for play:
- Your child will probably have the most fun inserting the pegs and making them fall—the pegs make a satisfying clattering sound when they’re released.
- When they’re interested, start with the “1” card and ask how many pegs there are. Continue in ascending order.
- As the numbers get higher, count the pegs with your child. They’re learning the order of numbers as well as what they mean.
- Invite them to trace each number with their finger and say it aloud.
- Set up all 10 pegs on a flat surface and invite your child to roll a ball and knock them over 🙃
The toys and other products in this article can be found in our Play Kits for 2-year-olds:

The Play Kits
Staged-based play essentials: designed by experts, built for babies and toddlers up to age 4.
Learn more
Montessori Placemat & Utensils
Have your child set the table on their own with Lovevery’s Montessori Placemat & Utensils. The colorful guide will help them know where everything goes. See inside the Montessori Placemat Set.
Learn more
Organic Nap Mat
Bring the comfort of home on the go with the 100% organic, OEKO-TEX® certified Nap Mat. The cozy set includes a padded mat, blanket, pillow, and custom buckles. Learn more about the Lovevery Nap Mat.
Learn more
Keep reading

22 - 24 Months
25 - 27 Months
28 - 30 Months
31 - 33 Months
34 - 36 Months
Best Montessori and learning toys for 2 year olds
The best toys for 2 year olds support emerging independence and sense of identity. They also give your child opportunities for fine and gross motor practice, problem-solving, practical life skills, and more.
13 - 15 Months
16 - 18 Months
19 - 21 Months
22 - 24 Months
The best Montessori and learning toys for 1 year olds
At 12 months old, your toddler is more mobile and curious than ever. The best toys support mobility, fine motor skills, language, and independence. See our best Montessori toys for 1-year-olds.

25 - 27 Months
28 - 30 Months
31 - 33 Months
34 - 36 Months
Preparing your child (and yourself!) for preschool
The transition to preschool can be equal parts exciting and nerve-wracking for both you and your child. Here's how to support them before their first day.